Handbook
Compact help for groups, list currencies, foreign currency conversion, cost splitting, multiple payers, lists, expenses, and settlements
balancico, clearly explained
Here you will find the key workflows in the app, from Quick Start and the setup assistant to groups, flexible cost splitting with amount mode, multiple payers, settings, exports, archives, and settling open balances.
Quick start
If you are using balancico for the first time, the setup assistant can guide you through members, your first list, and your first expense.
1. Create or set up a group
Create a new group, use guided setup if needed, or join an existing one via link, code, or QR code.
2. Add members, list, and expense
Create cost-sharing members, add a list, and record expenses with one or more payers.
3. Review balances and settle
balancico shows who owes what and helps you record settlements directly.
Overview of sections
Choose the section you would like to explore, including settings, member details, exports, archives, and Premium Insights.
1. Getting started and navigation
This chapter explains the app’s basic structure and shows how to move between Home, groups, and lists.
2. Managing groups on Home
Here you create groups, join existing ones, and manage the groups already visible in your overview.
3. Organizing and sharing a group
The group detail screen is the control center for members, default cost splitting, categories, lists, currency, and invitations.
4. Lists, expenses, and settlement
In lists, you record expenses and payments, edit entries, and settle balances when needed.
5. Using member details
Member details show one person in the context of the entire group so you can understand contributions, balances, and settlement payments.
6. Settings and personalization
In settings, you control language, formatting, notifications, currency, privacy options, and the overall look of the app.
7. Premium, archives, and everyday use
This chapter brings together advanced features such as Premium Insights, archives, sorting, synchronization, and the About area.
1. Getting started and navigation
This chapter explains the app’s basic structure and shows how to move between Home, groups, and lists.
Show details
1. Getting started and navigation
This chapter explains the app’s basic structure and shows how to move between Home, groups, and lists.
What you can do here
Typical workflows
How balancico is structured
- Home is the overview of all groups you can currently open or manage.
- A group is the main container for members, categories, lists, and group-wide settlement.
- A list is a single context such as accommodation, restaurant, shopping, or monthly expenses.
How to get to the right place
- The side menu gives access to settings, Premium Insights, sorting, and archives.
- Invite links, QR codes, and notifications can take you directly to a group or a list.
- If Premium is active, the app can reopen the last screen you used.
What Home always shows at a glance
- The start screen includes group cards, the menu button, the sync status icon, and the join button.
- At the bottom right, you will find the button for creating a new group.
- That makes the main navigation and the most important quick actions easy to understand.
Start
1. Getting started and navigation
This chapter explains the app’s basic structure and shows how to move between Home, groups, and lists.
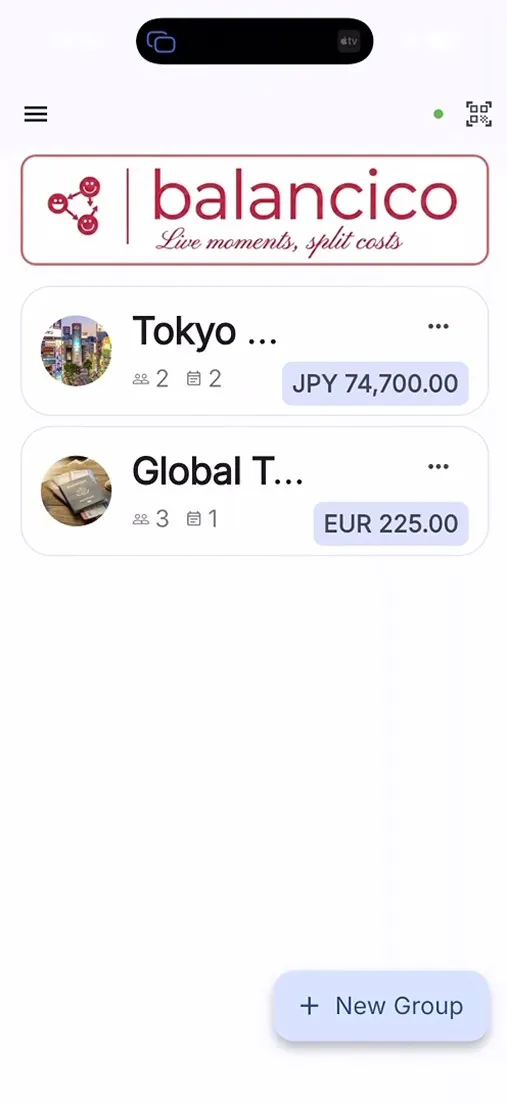
Understand the group overview as your starting point
Recognize the side menu and the main shortcuts
2. Managing groups on Home
Here you create groups, join existing ones, and manage the groups already visible in your overview.
Show details
2. Managing groups on Home
Here you create groups, join existing ones, and manage the groups already visible in your overview.
What you can do here
Typical workflows
Create a new group
- Choose a group name and the group currency.
- You can optionally use an existing group as a template and reuse members or categories.
- After saving, the new group opens immediately; alternatively, guided setup walks you through members, the first list, and an optional first expense.
- If no categories are reused, balancico can add suitable default categories when needed.
Join an existing group
- Use the join button and enter an invite code or paste a link.
- The app checks validity, sign-in status, plan limits, and whether the target group fits your current plan.
- If everything is valid, the group appears in your overview right away.
- In the Basic plan, the app can also require you to choose which group you currently manage.
Use group cards and the group menu effectively
- Group cards show the name, member count, list count, total spending, and possibly unread activity.
- From the group card menu you can edit, archive, merge, leave, or delete a group.
- If you merge groups with different currencies, you first choose a target currency and can convert entries directly.
Home
2. Managing groups on Home
Here you create groups, join existing ones, and manage the groups already visible in your overview.
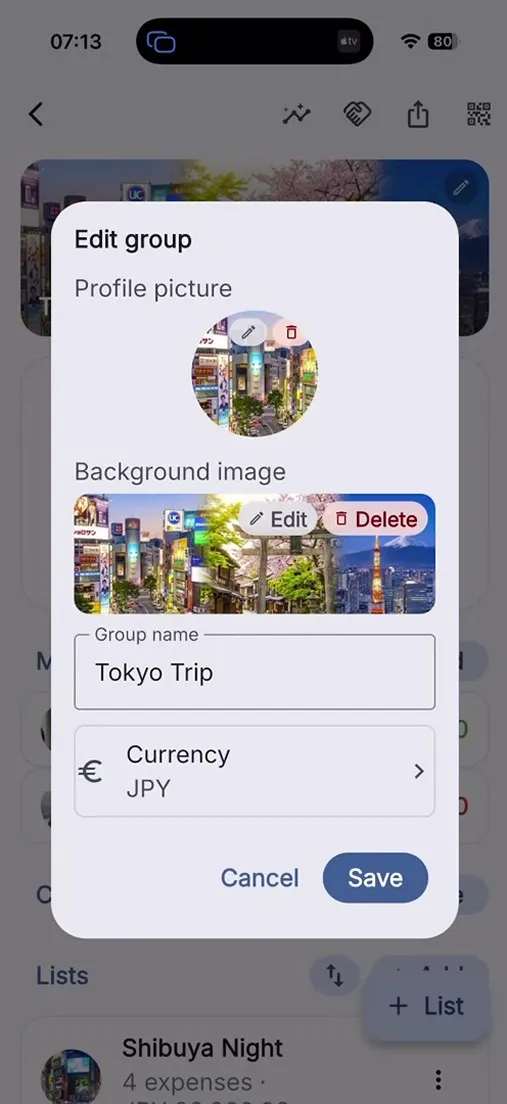
Create a new group
Use guided setup for members, first list, and first expense
3. Organizing and sharing a group
The group detail screen is the control center for members, default cost splitting, categories, lists, currency, and invitations.
Show details
3. Organizing and sharing a group
The group detail screen is the control center for members, default cost splitting, categories, lists, currency, and invitations.
What you can do here
Typical workflows
Edit, share, and merge the group
- From the app bar, you can share the invite code, web link, app link, and QR code.
- In edit mode, you can change the name, group image, background image, and currency.
- When merging, the app first checks whether both groups use the same currency.
- If the currencies differ, you choose a target currency from those two group currencies and can convert the affected group’s entries right away.
- When changing the group currency, balancico can convert existing expenses using an exchange rate and rounding.
Manage members, cost splitting, categories, and lists
- New members are added directly in the members section.
- A member is a cost-sharing unit: it can be one person, a family, or a couple represented as one accounting unit.
- With the “Cost splitting” action, you define the default mode for new expenses in the group: equal shares, weights, percentages, or exact amounts.
- You can also store default values per member; when switching between weights and percentages, the app converts existing values in a sensible way.
- Before removing a member, the app can show open balances or relevant payments, including the current amount if needed.
- Categories can be managed, renamed, or deleted with a replacement category; advanced category management is Premium-only.
- Lists can be created, reordered via drag and drop, archived, cleared, or deleted.
Use group settlement and export
- Group settlement bundles all open lists and suggests payments across the whole group.
- You can optionally choose a settlement display currency without changing the actual booking currency.
- Per list, you can decide whether it should be settled, closed afterwards, or used for reminders.
- Group export lets you export multiple lists as CSV or PDF and is a Premium feature.
Group
3. Organizing and sharing a group
The group detail screen is the control center for members, default cost splitting, categories, lists, currency, and invitations.

Share the group and send invitations
Configure the default cost split for the group
4. Lists, expenses, and settlement
In lists, you record expenses and payments, edit entries, and settle balances when needed.
Show details
4. Lists, expenses, and settlement
In lists, you record expenses and payments, edit entries, and settle balances when needed.
What you can do here
Typical workflows
Enter expenses and payments
- For an expense, enter the description, amount, date, category, payer, and participating members.
- If several people paid, open the payer split; in amount mode, the sum of payer amounts automatically becomes the total expense amount.
- The group can define a default mode for new expenses; you can still override that mode directly in the expense form when needed.
- For cost splitting, you can choose equal shares, weights, percentages, or exact amounts. In amount mode, the individual amounts must add up exactly to the total amount.
- Payer split and cost split are intentionally separate: one describes who actually paid, the other describes who owes which share.
- Payments are used for direct settlement between two people and reduce open balances.
- Entries can later be edited or deleted via the menu or a swipe gesture.
- The app can remember the last category or payer to speed up future entries.
List currency and foreign expense conversion
- Each list has its own accounting currency, set when editing the list.
- Expense amounts are entered in the list currency.
- Tap Convert next to the amount field to enter the original amount in a different currency; the app converts it into the list currency automatically.
- The original amount, original currency, exchange rate, source, and timestamp are stored and included in exports.
Settle balances and close a list
- The settlement dialog automatically suggests payments.
- You can optionally choose a settlement currency for display and send reminders.
- After recording the payments, the list can be closed immediately or reopened later if needed.
- If no open payments are left, the dialog can still be used just to close the list.
Other important list actions
- You can create a new category directly from the expense form; this is a Premium feature.
- New entries are marked as read when you open the list, but the new badge stays visible for the configured duration.
- Lists can be exported as CSV or PDF, edited, cleared, reopened, and updated with new images.
- List export is Premium-only.
List
4. Lists, expenses, and settlement
In lists, you record expenses and payments, edit entries, and settle balances when needed.
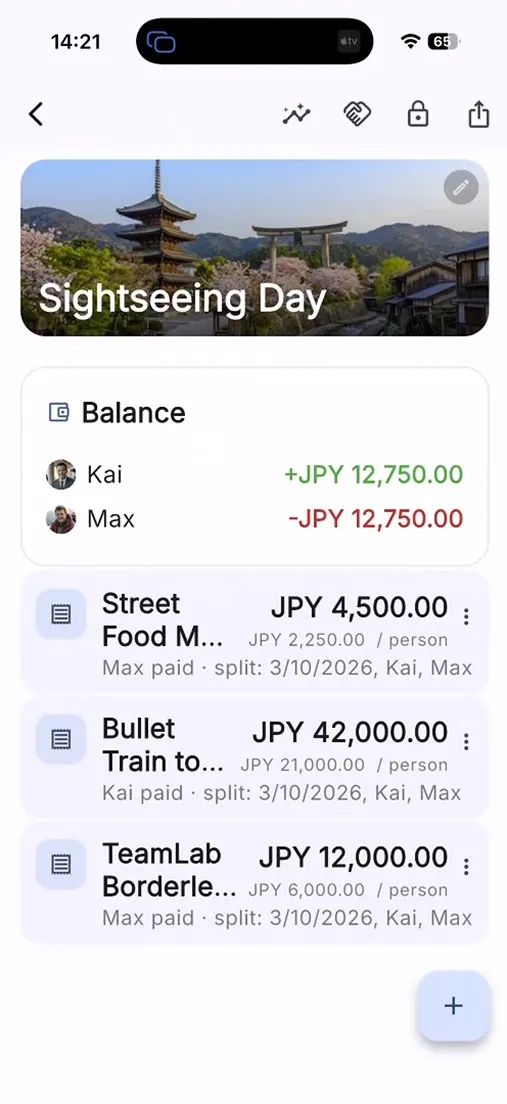
Set the list currency and record expenses in a foreign currency using Convert
Add expenses and payments
5. Using member details
Member details show one person in the context of the entire group so you can understand contributions, balances, and settlement payments.
Show details
5. Using member details
Member details show one person in the context of the entire group so you can understand contributions, balances, and settlement payments.
What you can do here
Typical workflows
What you can see in member details
- The page shows the person’s profile image, background image, and name.
- You only see the lists in the group where that person has expenses or settlement payments.
- For each list, you can review how much the person paid, the current balance, and the related expenses or settlement payments.
How to edit a member
- Open member details from the members section of a group.
- Tap Edit to change the name, profile image, or background image.
- After saving, the updated data is visible directly in the group.
Member
5. Using member details
Member details show one person in the context of the entire group so you can understand contributions, balances, and settlement payments.
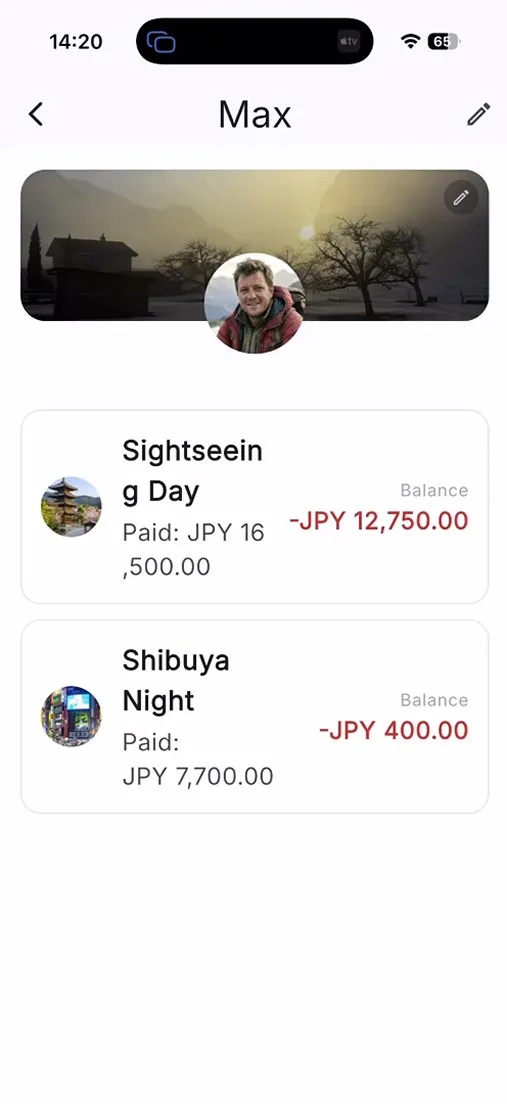
Manage profile image, background image, and name
Show only the relevant lists for that person
6. Settings and personalization
In settings, you control language, formatting, notifications, currency, privacy options, and the overall look of the app.
Show details
6. Settings and personalization
In settings, you control language, formatting, notifications, currency, privacy options, and the overall look of the app.
What you can do here
Typical workflows
Configure app behavior
- You can set the app language and regional format independently and review a live preview before saving.
- When changing the language, the app can offer to translate existing default categories.
- Notifications can be managed separately for new, edited, deleted, and settlement-related events.
- You can also define the default currency, rounding, new-entry markers, and — with Premium — reopen the last screen.
- In the plan section, you can buy Premium, restore purchases, and review that Basic is ad-supported while Premium is presented as a one-time purchase.
Customize the design
- In the design editor, you can choose presets or define your own colors.
- You can also set background images, adjust transparency, save custom designs, and reset to the default design.
- Privacy options can be opened from settings when the platform supports them; otherwise the app shows a short error message.
Settings
6. Settings and personalization
In settings, you control language, formatting, notifications, currency, privacy options, and the overall look of the app.
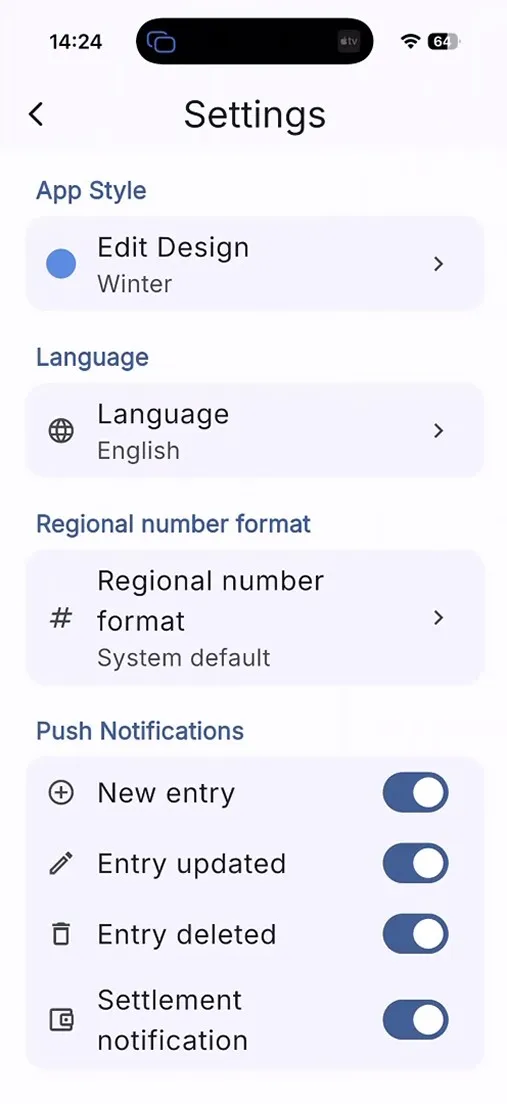
Adjust language, region, and currency format
Configure notifications and defaults
7. Premium, archives, and everyday use
This chapter brings together advanced features such as Premium Insights, archives, sorting, synchronization, and the About area.
Show details
7. Premium, archives, and everyday use
This chapter brings together advanced features such as Premium Insights, archives, sorting, synchronization, and the About area.
What you can do here
Typical workflows
Advanced analysis and organization
- Premium Insights help you analyze trends, period comparisons, and data by group, list, member, or category.
- The statistics view can show totals, repayments, averages, weekday patterns, outliers, and other key metrics.
- You can also choose time ranges and a display currency, and add missing exchange rates when required.
- Groups and lists can be archived, restored, and reordered.
Practical notes for everyday use
- Images can be cropped in groups, lists, member profiles, and app design.
- The app syncs across devices and shows an online/offline indicator.
- Certain notices are intentionally suppressed when you already have the same area open.
- The About area contains the app version, a short description, and privacy-related information; the version is read directly from the app package.
- Handbook, FAQ, and support are available from the app menu in the selected app language.
Find archives and sorting quickly
- Archived groups are available from the side menu and can be restored there.
- Archived lists appear in a dedicated section within the group detail screen.
- Groups and lists can be reordered via drag and drop so your most important areas stay at the top.
Advanced
7. Premium, archives, and everyday use
This chapter brings together advanced features such as Premium Insights, archives, sorting, synchronization, and the About area.
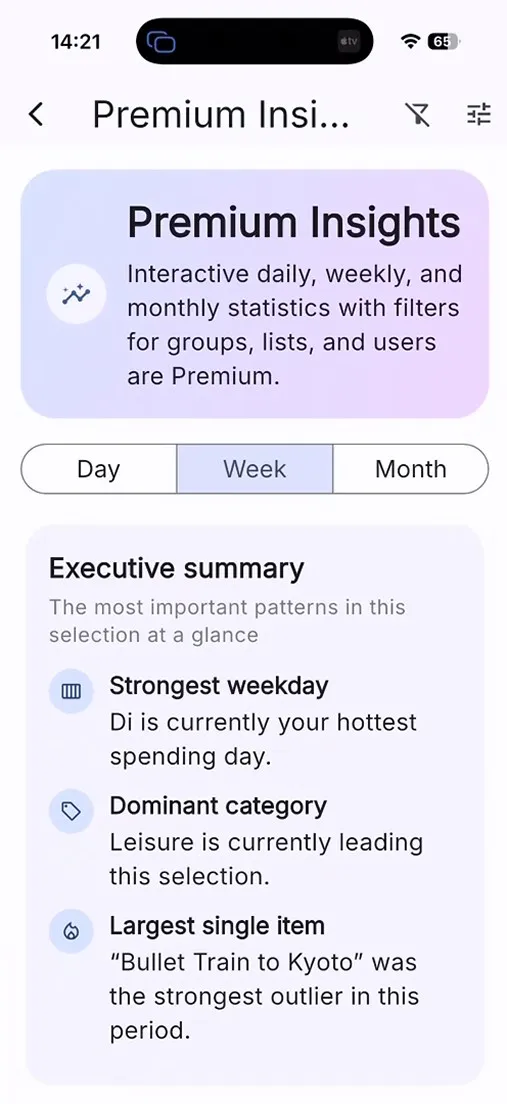
Use Premium Insights, export, and archive features
Understand synchronization, image cropping, and practical day-to-day behavior
More guidance and help
Find answers, detailed guidance, release notes, direct support, and the right place for new product ideas.
FAQ
Find answers to common questions about groups, lists, amount-based splitting, multiple payers, synchronization, currencies, and Premium in balancico.app.
Open page
Release notes
Current release notes for balancico.app, including amount-based splitting, the setup assistant, in-app help, multiple payers, and onboarding.
Open page
Support
Contact balancico.app support and see which details help with questions about groups, expenses, synchronization, and Premium.
Open page
Feature Requests
Share new ideas for balancico.app, explain the problem and the benefit, and help us improve trips, flatshares, and shared expense workflows.
Open page